
Mobile House မန္ဘာ မ်ား ေက်းဇူး ၿပဳ ၿပီး www.mobilehouse.co.nr မွ တိုက္ ရိုက္ ၀င္ေပး ပါ ရန္ ႏွင္႔ အသစ္ တင္ သမွ် ကို သိရွိ ေစရန္
https://www.facebook.com/MobileHouseServiceCentre
မွာ Like လုပ္ ေပး ၾက ပါ ....

Friday, May 10, 2013

3-Way Boot to your Power Menu ထည္႔နည္း

ဖုန္းကိုကလိ ခ်င္ တဲ႔ သူ ေတြ အတြက္ ပါ ။ အရင္ ဆံုး Backup ဆြဲ ထားပါ ။တစ္ခုခု အဆင္မေၿပ ရင္ ေဆာ႔၀္ ၿပန္ေရး ရပါမယ္ ။


Requirements

Quote:
  • Attached File
  • Notepad++
  • Backsmali Manager
  • Apktool
  • Patience
  • Brain Off cource
Ok i have divided this Guide in Two Parts to make it easy
In First Part we will edit framework and in second part we will edit android policy.jar


Part-1
  • Decompile Your framework-res.apk and move to
    Code:
    framework-res\res\values
  • Open Strings.xml with notepad++ or any other tool you use
    paste the following lines in the end
    Code:
    <string name="global_action_reboot_now">Restart</string>
    <string name="global_action_reboot_recovery">Recovery</string>

    Close it and recompile.
    Then again decompile and move to
    Code:
    framework-res\res\values
    and note the following ids (you may have different)


    Here we end our First Part.


    Part-2
  • Decompile your android.policy.jar using backsmali managaer or any other tool

    vDownload and extract the attached file to
    Code:
    android.policy\com\android\internal\policy\impl
  • Then open GlobalActions.smali
    And do how i say
  • Before
    Code:
    .line 165
        iget-object v0, p0, Lcom/android/internal/policy/impl/GlobalActions;->mItems:Ljava/util/ArrayList;
    
        new-instance v1, Lcom/android/internal/policy/impl/GlobalActions$2;
    
        const v2, 0x104013c
    
        invoke-direct {v1, p0, v12, v2}, Lcom/android/internal/policy/impl/GlobalActions$2;-><init>(Lcom/android/internal/policy/impl/GlobalActions;II)V
    
        invoke-virtual {v0, v1}, Ljava/util/ArrayList;->add(Ljava/lang/Object;)Z
    
        .line 185
        iget-object v0, p0, Lcom/android/internal/policy/impl/GlobalActions;->mItems:Ljava/util/ArrayList;
    
        iget-object v1, p0, Lcom/android/internal/policy/impl/GlobalActions;->mAirplaneModeOn:Lcom/android/internal/policy/impl/GlobalActions$ToggleAction;
    
        invoke-virtual {v0, v1}, Ljava/util/ArrayList;->add(Ljava/lang/Object;)Z
  • After

    Just Add the Bold ( For A7/A5 Users just copy paste )

    Code:
    .line 165
        iget-object v0, p0, Lcom/android/internal/policy/impl/GlobalActions;->mItems:Ljava/util/ArrayList;
    
        new-instance v1, Lcom/android/internal/policy/impl/GlobalActions$2;
    
        const v2, 0x104013a
    
        invoke-direct {v1, p0, v12, v2}, Lcom/android/internal/policy/impl/GlobalActions$2;-><init>(Lcom/android/internal/policy/impl/GlobalActions;II)V
    
        invoke-virtual {v0, v1}, Ljava/util/ArrayList;->add(Ljava/lang/Object;)Z
    
        .line 183
        iget-object v0, p0, Lcom/android/internal/policy/impl/GlobalActions;->mItems:Ljava/util/ArrayList;
    
        new-instance v1, Lcom/android/internal/policy/impl/GlobalActions$8;
    
        const v2, 0x104054d
    
        invoke-direct {v1, p0, v12, v2}, Lcom/android/internal/policy/impl/GlobalActions$8;-><init>(Lcom/android/internal/policy/impl/GlobalActions;II)V
    
        invoke-virtual {v0, v1}, Ljava/util/ArrayList;->add(Ljava/lang/Object;)Z
    
        .line 184
        iget-object v0, p0, Lcom/android/internal/policy/impl/GlobalActions;->mItems:Ljava/util/ArrayList;
    
        new-instance v1, Lcom/android/internal/policy/impl/GlobalActions$9;
    
        const v2, 0x104054e
    
        invoke-direct {v1, p0, v12, v2}, Lcom/android/internal/policy/impl/GlobalActions$9;-><init>(Lcom/android/internal/policy/impl/GlobalActions;II)V
    
        invoke-virtual {v0, v1}, Ljava/util/ArrayList;->add(Ljava/lang/Object;)Z
    
        .line 185
        iget-object v0, p0, Lcom/android/internal/policy/impl/GlobalActions;->mItems:Ljava/util/ArrayList;
    
        iget-object v1, p0, Lcom/android/internal/policy/impl/GlobalActions;->mAirplaneModeOn:Lcom/android/internal/policy/impl/GlobalActions$ToggleAction;
    
        invoke-virtual {v0, v1}, Ljava/util/ArrayList;->add(Ljava/lang/Object;)Z
    Note: Note Ids must be same as you noted in part 1

    Code:
    Only Replace last 7 digits of IDS when renaming in the above step 
  • Recompile and replace the classes.dex using Z-zip

Yipeee You Now have 3 Way boot


This Guide is tested by me and is working Fine

I have uploaded the Modded files for A5/A7/A7+ users so they can download and enjoy

Device Tested for this MOD


Screenshot


Attached Files
File Type: rar sources.rar - [Click for QR Code] (1.5 KB, 98 views)
File Type: rar MOD-files.rar - [Click for QR Code] (2.89 MB, 98 views)
ဆက္ဖတ္ရန္>>>

Iphone IMEI စစ္ တဲ႔ ကြန္ ၿပဴတာ ေဆာ႔၀္


Download

.Net Framework 3.5 SP1
Note: .Net Framework 3.5 SP1 is Required to Run This SOftware. If You Have Already Installed This Then Just Enjoy It 
ဆက္ဖတ္ရန္>>>

Tuesday, May 7, 2013

Samsung Galaxy စီးရီး Version အၿမင္႔ ဖုန္း မ်ား App ေလး နဲ႔ အလြယ္ တကူ Root မယ္


 Superuser or Supersu ေရြးပါ ။
 ၿပီးရင္ Gimli ႏိုပ္ေပး လိုက္ပါ ။

ရတယ္ မရဘူး ကို ေအာက္က စာ သား ေတြ တက္ လာပါမယ္ ။
  • "Success ... Superuser and su binary installed. You have to reboot your device"
  • "Failed ... Exploit work but installation of Superuser and su binary have failed"
  • "Half-Success :-/ ... system partition is read-only, use local.prop trick. Reboot your device and use adb to see if it run as root", happen when the filesystem in use on system partition is a read only filesystem (ex: squashfs)
  • "Failed ... Try another exploit if available"
 ေအာက္ကဖုန္း ေတြ မွာ အသံုးၿပဳႏိုင္ပါမယ္  :
  • Samsung Galaxy S2 Epic 4G Touch - SPH-D710
  • Samsung Galaxy S2 AT&T SGH-I777
  • Samsung Galaxy S2 GT-I9100
  • Samsung Galaxy S3 GT-I9300
  • Samsung Galaxy S3 LTE GT-I9305
  • Samsung Galaxy Note GT-N7000
  • Samsung Galaxy Note 2 GT-N7100
  • Samsung Galaxy Note 2 LTE GT-N7105
  • Samsung Galaxy Note 8.0
  • AT&T Galaxy Note 2 SGH-I317
  • Verizon Galaxy Note 2 SCH-I605
  • T-Mobile Galaxy Note 2 T-889
  • Samsung Galaxy Camera EK-GC100
  • Samsung Galaxy Tab Plus GT-P6210
  • Samsung Galaxy Note 10.1 GT-N8000, GT-N8010, GT-N8013, GT-N8020
  • iBerry Auxus CoreX2 3G and CoreX4 3G
  • Motorola Droid X
  • Droid 2 (a955)
  • Droid 2 Global (a956)
  • R2D2 (a957)
  • Droid X (MB810)
  • Cliq 2 MB611
  • Archos Gen8
  • Coolpad Quattro 4G
  • LG P970 Optimus Black
  • LG Marquee LS855
  • Parrot ASTEROID Smart
http://www.mobilehouse.co.nr

Attached Files
File Type: apk Framaroot-1.4.apk
ဆက္ဖတ္ရန္>>>

Android သမားမ်ားအတြက္ Android Tool

                 Android သမားမ်ားအတြက္    Android Tool ေဆာ႔၀္

Last Version is 1.0 
ဘာေတြလုပ္လို႔ ရလဲ ဆိုေတာ႔
click  တစ္ခ်က္ေခါက္ ရံု နဲ႔
၁။Start/၂။kill Adb server 
၃။List Devices 
၄။Reboot Go Recovery 
၅။Go Download 
၆။Wipe Data in Adb/Fastboot Mode 
၇။Password ဖ်က္မယ္(Root Needed) 
၈။Pattern lock ဖ်က္မယ္ (Root Needed) 
၉။Gmail Account ဖ်က္မယ္ (Root Needed) 

၁၀။ Zip Flasher Select Zip File And send automatically to sdcard And Send phone to Recovery Mode With instructions 

၁၁။ App Installer (one click) Select apk file and it will install 

၁၂။ Utilities Full Key Tool ( Usefull incase your phone button not work :-O 
၁၃။Root Checker 
၁၄။Permission Fixer

၁၅။ File Manager Shows All installed Apps 

၁၆။ Flasher (Fastboot Mode) One Click Flash splash\Hboot\Recovery\Radio 


ဆက္ဖတ္ရန္>>>

Thursday, May 2, 2013

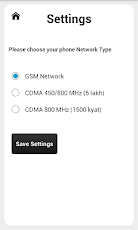
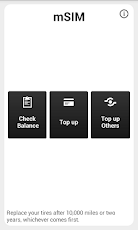
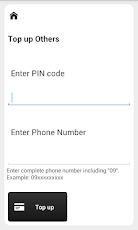
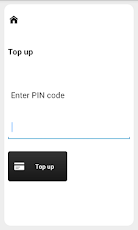
mSIM for Android

mSIM

Pyae Phyoe Shein


[✔] GSM Network
[✔] CDMA 450/800 MHz network
[✔] CDMA 800 MHz (1500 kyats)
တို႕ ကို လက္က်န္ ၾကည္႕၊ ေငြ ၿဖည္႕ ၊ တၿခား သူကို ၿဖည္ေပး ၿခင္း မ်ား ကို အလြယ္တကူ ၿပဳလုပ္ ႏုိင္ပါတယ္ ။

 Download Here
 http://www.mediafire.com/?9gw4q149w7crwj8

ပထမ ဆံုး မိမိ ဖုန္း GSM ဆို GSM ေရြးပါ ။ အရင္ cdma 450/800  ေတြဆို အလယ္ကဟာေရြးပါ။ ေအာက္ဆံုး ကေတာ႔ ခုထြက္ထားတဲ႔ cdma 800 1500 တန္ဖုန္း အတြက္ပါ။


ဆက္ဖတ္ရန္>>>

LG Optimus L9 P769 Root လုပ္နည္း


Root the LG Optimus L9 P769

Downloading Required Files:


2. Root Package ( ကိုေဒါင္း ၿပီး ၿဖည္ခ် လိုက္ပါ )

III.LG Optimus L9 P769: ကို Root စလုပ္လို႔ ရပါၿပီ ။

1. ပထမ လုပ္ထားတဲ႔  l9.bat ကို Root Package ထဲကူးထည္႕ပါ ။
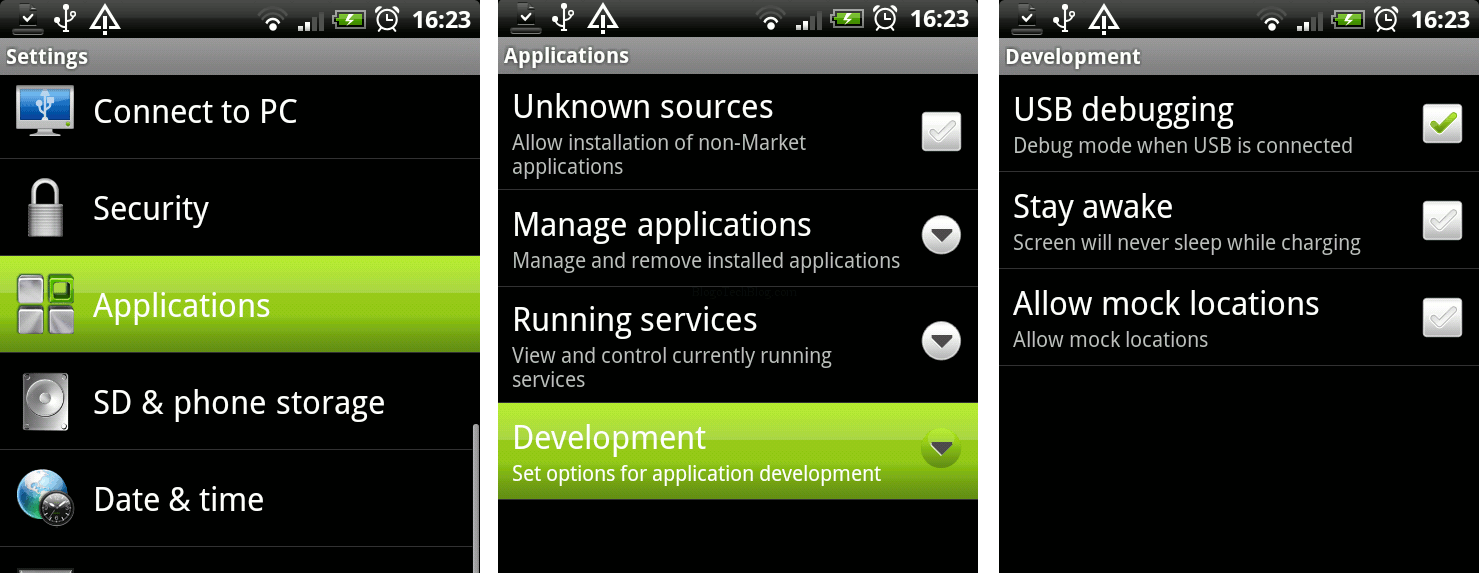
2. USB debugging ကို Menu>>Settings>>Developer options>>USB debugging ကေန အမွန္ၿခစ္ေပးလိုက္ပါ ။
3. ဖုန္းကို ကြန္ၿပဳတာ နဲ႔ခ်ိတ္ ေပးလိုက္ပါ ။
4. USB LG Mode ကိုေရြးေပးပါ.
5. l9.bat ကို ဖြင္႔ ပါ ။
6. ဖုန္း မွာ restore my data တက္လာ ရင္ ႏိုပ္ေပးလိုက္ပါ ။
7.Reboot က် သြားပါမယ္ ။မက် သြားရင္ ခ် ေပးလိုက္ပါ ။
8.တက္လာ ရင္ Root ၿဖစ္ပါၿပီ ။


ဆက္ဖတ္ရန္>>>

Root_with_Restore_by_Bin4ry_v30 (Root MANY ANDROID)

sony နဲ႔ တရုတ္ Android ဖုန္း ေတာ္ေတာ္ မ်ားမ်ား Root လုပ္ႏိုင္ပါတယ္ ။
 
Download:
Root_with_Restore_by_Bin4ry_v30: [Glass Root added]

Mirror 1 Uploaded.to : Click
Mirror 2 Cloudzer.net : Click


....
ဆက္ဖတ္ရန္>>>

LG Optimus L3 E400 Root လုပ္ နည္း


  1. ဒါကို ေဒါင္းပါ ။ – Windows | Linux/OSX
  2. USB Debugging Enable လုပ္ပါ ။
  3. Setting>Applications>Development ထဲကUSB Debugging ကို on ပါ
    root lg spectrum
  4. ရလာတဲ႔ ဖိုင္ကို ၿဖည္လိုက္ပါ ။ အထဲ မွာ “run.bat” ပါပါတယ္ ။
  5. If you are on Linux or OSX, execute “run.sh” using the terminal.
  6. ခဏ ေန Reboot က် သြား ၿပီး ၿပန္တက္ လာ ရင္ Root ရပါၿပီ .
ဆက္ဖတ္ရန္>>>

Android ဖုန္းတစ္လံုး Root မလုပ္ခင္သတိျပဳသင့္သည့္အခ်က္မ်ား

Android ဖုန္းတစ္လံုး Root မလုပ္ခင္သတိျပဳသင့္သည့္အခ်က္မ်ား
 

ေအာက္က အခ်က္ ေတြကို စစ္ေဆးၾကည္႕ ပါ ။

  • သင္႔ ဖုန္း  Firmware ၿပန္တင္ လို႔ ရ မရ ? မရ လွ်င္  မလုပ္သင္႔ ပါဘူး အထူးသၿဖင္႔ တရုတ္ ဖုန္း ေတြမွာ Root လုပ္ ရင္း Firmware ေသ တက္ ပါတယ္ ။
  • ကြန္ပ်ဴတာတြင္ Android ADB Driver ရွိရန္လိုအပ္ပါသည္။
  •  သက္ဆိုင္ရာဖုန္း Driver ကိုကြန္ျပဴတာတြင္ Install ထားပါ။
  •  System Settings  >Applications >Development >Usb debugging ကို ON ။ 
  •  System settings>Fastboot ကို Off ရန္ ။

  •   ADB Driver ကိုေတာ့ ဒီမွာ ေဒါင္းပါ။ ( 91suit for android  သြင္းထားလဲ ရပါတယ္)
  •  Sony Ericsson Driver ေလးကိုေတာ့ ဒီမွာ ေဒါင္းပါ။
  •  ဒီမွာ ကေတာ့ HTC Driver ပါ။
  • ဒါေလး ကေတာ့ Samsung Driver ပါ။( Samsung Kies သြင္းထား လဲရပါတယ္ )
  •  
  • 91suit ႏွင္႔ Samsung Kies ကို ဖုန္းဆိုင္ရာ ကြန္ၿပဴတာ ေဆာ႔၀္ ေအာက္မွာ တင္ထားေပးပါတယ္ ။
ဆက္ဖတ္ရန္>>>

ခရီး ထြက္မည္

မနက္ ၿဖန္ ရန္ကုန္ သြား မွာ မလို႕  ၿပန္ ေရာက္ မွ ေမးထားသည္ မ်ား ႏွင္႔ Post အသစ္ မ်ား ထပ္ တင္ ေပး သြားပါမည္ ။


....
ဆက္ဖတ္ရန္>>>